

Entra ID Password Protection: From “P@ssw0rd” to Protected
If you use Office 365, you also have Entra ID. In short, it is where your users, groups, and application identities are stored and where authentication, such as passwords, MFA and sign-in requirements, are handled. You might also still have an Active Directory on-premises (it does not even have to be synced with Entra ID). If you do, then this post should be of interest to you.
- Insight

I hate password protection. Breaking passwords is much harder.
– Inhouse Offensive
One of the Entra ID security features we most commonly see unconfigured or misconfigured, both in incidents and while doing security assessments, is the on-premises Active Directory part of Entra password protection. It’s one of those powerful features included in Microsoft Entra Plan 1 organizations seldom even know that it exists even though it has been in general availability since 2019.
In the Entra portal, under the “Authentication methods” menu item and “Password protection” you might have seen the following:

You might even have enabled “Enable password protection on Windows Server Active Directory”. Unfortunately, that single toggle is not enough to fully enable it. It is just one of the configuration steps needed. Follow along as we go through the details of how and why you should take the time to enable it the correct way in your own environment sooner rather than later.
If you are less interested in the “why” and more the “how” you can skip to the “How to install and configure”-section.
What it is and Why do You Need it
If your users are cloud-only and not hybrid users (synced from Active Directory) they will be protected by Entra Password Protection’s global banned password list even if you are on the Entra Free license.
The global banned passwords list is maintained by Microsoft and includes common weak passwords, as well as passwords currently being used in attacks, based on telemetry from all Entra tenants at Microsoft. Microsoft does not disclose this list anywhere publicly.
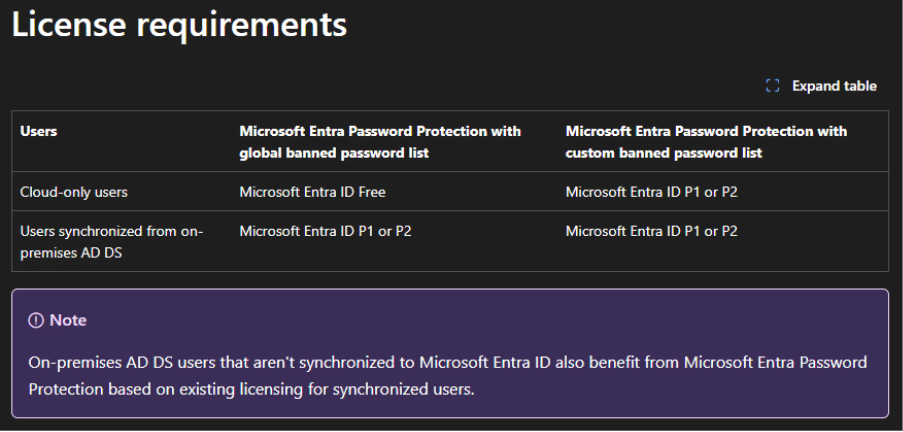
If you also want to use the custom banned password list or want to protect hybrid and/or on-premises users, you need to buy Entra Plan 1 licenses for cloud and hybrid users. On-premises users, if they are not synced to Entra ID, are included if your cloud and hybrid users have the license.
The custom banned password list is something you as a customer define and may include for example office locations, product names, language specific words and old standard passwords. We will come back to our recommendation on what to add and how later in the configuration section.
You might wonder why you should bother since you have MFA configured and are going passwordless soon anyway? Well, passwords are still your first line of defence in many cases. There might be those few accounts that can’t go passwordless because of for example software incompatibility, production line users that need a mailbox but are not issued MFA capable devices or hardware, and the old shared account you don’t seem to be able to get rid of.
Entra password protection helps your users and your organization to choose better passwords. “Qwerty12345!” should not be the password the threat actor was able to use to sign in to the old terminal services solution which was not supposed to be online anymore. Then use the account to exfiltrate sensitive company data to use as leverage for a ransom demand, or worse.
If you want more information about how the service evaluates password Microsoft documentation explains it in more detail.
Passwords are only evaluated when changed or reset. It does not evaluate any existing passwords in the environment, making implementation easier and safer in a production environment. When the password filter drivers, which is included in the DC agent, receives a password change or reset it will forward this request to the DC Agent which uses the password policy stored in SYSVOL to fail or pass the request.
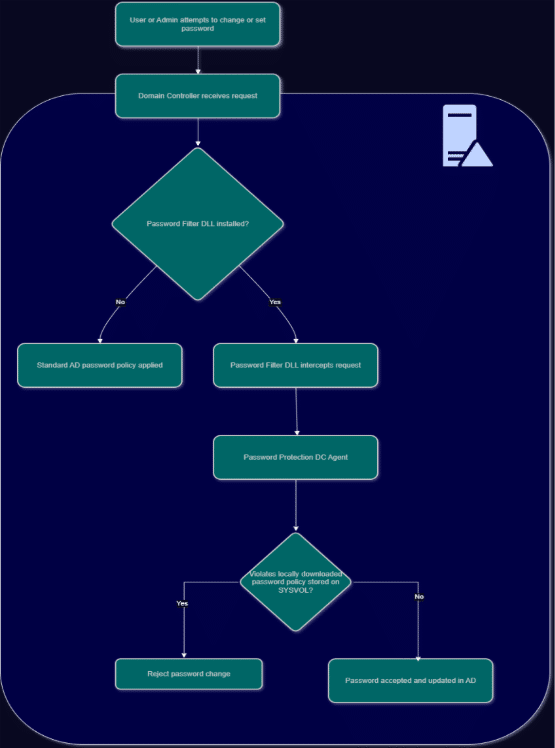
The DC Agent will regularly request a new password policy from Entra ID and the Proxy receives and forwards these requests from the DC Agents to Entra ID.
What to Add to the Custom Banned Password List
There are some common mistakes organizations do when populating the banned password list. The most common one being that they add many variants of the same word. If you want to ban the word “Company” for example, there is no need to add “c0mpany”, “comp4ny”, “CoMpAnY”. Microsoft will do normalization of the passwords when they are evaluated, so you only need to add the word you want to ban.
You also do not need to add the company name of the company which owns the tenant. Microsoft already bans, for example, the tenant name and owner organization name.
Then what should you add?
If, for example, your company has a product called “yBookcase”. Add the word “ybookcase”. Your company might own a subsidiary called “CompanyB” located in Stockholm on “Highstreet 5”, then add “companyb”, “stockholm” and “highstreet” to the list. These are examples of easily searchable information associated with your company, and you should add as many of these as you can. You might also know that the service desk used to give new users the password “TheOneSecret!”. Add “theonesecret” to the list. Another example might be if you have parts of the organization in different countries, adding the same word in different languages will also help. Add words one word per line for a maximum of 1,000 words.
These are just some examples of things you want to add. However, this does not mean that they cannot use these words in the password if the password is long and complex enough. If we use the list we created with the above examples and a user creates the password “32 ybookcases in a Stockholm suburb#” that will still be allowed since it also contains enough other characters.
Microsoft does the following basic calculation of the password:
- Each banned password found in a user’s password is given one point.
- Each remaining character that isn’t part of a banned password is given one point.
- A password must be at least five (5) points to be accepted.
How to Install and Configure
If you want to protect all users whether they are cloud-only, hybrid or on-premises, there are three parts to the installation and configuration of Entra Password Protection.
Firstly, we have the cloud configuration we already showed you in the introduction. In the Entra portal (entra.microsoft.com), under the “Authentication methods” menu item and “Password protection”. Switch “Enforce custom list” to “Yes”, then add your list of banned words here. Switch “Enable password protection on Windows Server Active Directory” to “Yes” and leave “Mode” on “Audit” for now. Don’t forget to hit “Save” at the top of the page.

Secondly, download both the DC agent and the proxy installers from Microsoft: Azure AD Password Protection for Windows Server Active Directory
Install the DC Agent on all domain controllers in the forests you want to protect. We recommend using either group policy or a Tier0 deployment solution to deploy it, new domain controllers will then always get the agent automatically. The agent does need a reboot of the domain controller before the password filter driver is loaded so you should add a second reboot after domain controller promotion to make sure the agent is activated.
Thirdly, the proxy agent needs to be installed on a server which is not a domain controller, one proxy is needed per forest. We usually use the same server as the Entra ID connect/cloud connect server since it’s already in Tier0 and should have the needed firewall rules (see table below) to be able to talk to Entra ID and the Microsoft login services, but it can be another Tier0 member server as well. Just make sure Entra Application Proxy is not on the same machine since the included updater agents are incompatible and will cause issues.
| Endpoint | Purpose |
| https://login.microsoftonline.com | Authentication requests |
| https://enterpriseregistration.windows.net | Microsoft Entra Password Protection functionality |
| https://autoupdate.msappproxy.net | Microsoft Entra Password Protection auto-upgrade functionality |
The proxy service is where most organizations get things wrong. DC agents do not talk directly to the online services. The proxy agent is required for the service to work, and the DC agents communicate only to the proxy. Only one proxy per forest is needed, but having at least two for redundancy is a good idea. Install it on the server, then configure it appropriately! The configuration needs the following:
- A PowerShell window running as administrator (ISE does not work with the following snippet)
- A Global Administrator account when running it for the first time in the tenant (When registering additional proxies, you only need a Security Administrator)
- An Enterprise Administrator account from the Active Directory forest
Use the following code snippet as an Enterprise Administrator running as local admin to configure it after the first install:
$GA = Read-Host -Prompt 'Global Administrator (example: account@domain.com)'

Import-Module AzureADPasswordProtection

if ((Get-Service AzureADPasswordProtectionProxy).Status -eq 'Running') {
  Register-AzureADPasswordProtectionProxy -AccountUpn $GA

  Register-AzureADPasswordProtectionForest -AccountUpn $GA
}
else {
  Write-Error 'Service AzureADPasswordProtectionProxy is not running. Start it then re-run the script'
}
On the second proxy you only need to run the “Register-AzureADPasswordProtectionProxy” command but running both again will not cause any issues.
For other configuration (like if you for example use a web proxy) see the official Microsoft documentation here.
Now once everything is configured, do not forget to switch from “Audit” mode to “Enforced” mode in the Entra portal, then hit Save, to fully activate the solution.

That’s it! Congratulations. You should now have a functioning solution to help your users choose better passwords.
Worth noting is DSRM passwords are also subject to the password policy. If you have problems when promoting new domain controllers, with an error message mentioning “password filter”, make sure a strong password was configured for the DSRM account!
Verification and Troubleshooting
To verify the functionality and to check which of your users are having a hard time choosing good passwords you need to check the event log on each of the DCs. The DC agent’s most interesting events are logged to:
\Applications and Services Logs\Microsoft\AzureADPasswordProtection\DCAgent\Admin
Here you will see many events with EventID 30006 where the agent logs enforcing a password policy. We recommend filtering out these events by right clicking the log, choose “Filter Current Log” and in the EventID box add “-30006” and then click OK.
In a perfect world you would only see 10014 and 10015 events, which are the events logged when a password is accepted. 10014 if the password was changed and 10015 if it was a password reset.
We all know that users are far from perfect, so most likely you will also see 10016 or 10017 fail events together with an event in the 30000-39999 range, which tells you which policy the password failed. The events contain the full name and name of the target user.
What you really do not want to see are 10012 and 10013 events, where password changes fail because of service errors. If you see a lot of these then something is not right and you need to start troubleshooting.
There are also some useful PowerShell cmdlets to run on the DC.
For troubleshooting you can run the following command on your domain controllers:
Test-AzureADPasswordProtectionDCAgentHealth -TestAll

Which should return only Passed tests if all is well.
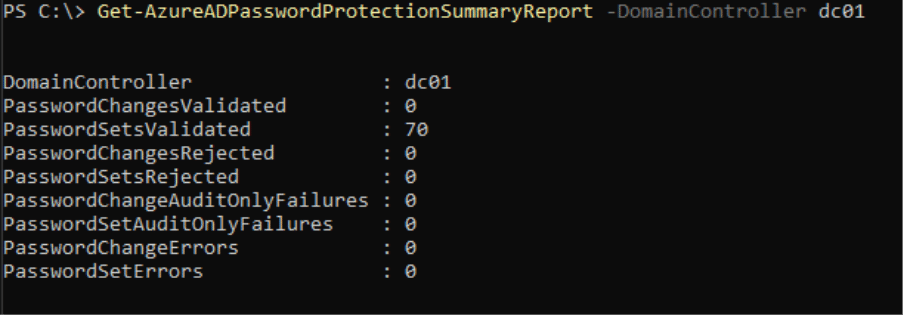
You can also get a quick summary without going through the entire event log by yourself by running:
Get-AzureADPasswordProtectionSummaryReport -DomainController <Your DC name>
The proxy servers event logs contain information about when it polls the tenant regularly and information about when it proxies information from a domain controller. You find it at:
\Applications and Services Logs\Microsoft\AzureADPasswordProtection\ProxyService\Operational
EventID 10001 for example is logged when the service has fully started. ID 20000 when it forwards a message from a DC and 20003 when it polls Entra regularly.
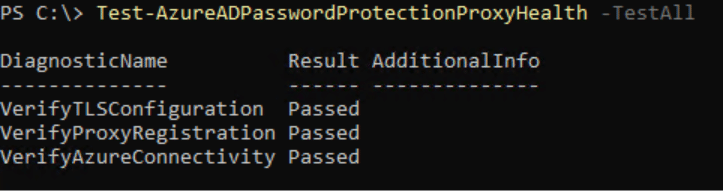
For troubleshooting the proxy service you can run the following command on your Password Protection Proxy server:
Test-AzureADPasswordProtectionProxyHealth -TestAll
Summary
So why would we write a blog post about a feature which has been around for at least seven years now? Is it because it once implemented, will fix all your problems? Not at all, it’s just one layer in a layered security approach. It is still true that it does not matter how strong your passwords are if they are phished or stolen, but password spray and password brute-force are still techniques threat actors use to gain initial access. Having a good password strategy, including helping users choose better passwords, together with multifactor authentication is still relevant in most environments today.
Passwordless sign-in technologies are here today but until you use them for 100% of sign-ins you will still have some passwords out there just waiting to be stolen by someone who wants to use them for malicious purposes. Why not spend an hour or two to read up on and implement Entra password protection all the way and if you read this far in the article you are already halfway. If you also have Entra Plan 1 licenses today there are no additional costs. Your users will start to benefit after their first password change or reset once Entra password protection has been implemented in on-premises Active Directory.
Stay ahead with cyber insights
Newsletter
Stay ahead in cybersecurity! Sign up for Truesec’s newsletter to receive the latest insights, expert tips, and industry news directly to your inbox. Join our community of professionals and stay informed about emerging threats, best practices, and exclusive updates from Truesec.
Your current browser privacy settings may be preventing this form from loading properly. To continue, please allow cookies/tracking for this site or temporarily disable strict privacy protection, then refresh the page.
If you’re still experiencing issues, please contact us at hello@truesec.com
Latest Insights

FortiNet SSO Vulnerability CVE-2025-59718 and CVE-2025-59719 Leading to Full System Compromise

Critical Vulnerabilities in Ivanti Sentry Allows Code Execution as Root (CVE-2026-10520 & CVE-2026-10523)